Sunday, July 31, 2016

July Pinterest Fun!

I'm just squeaking in here on the last day of July with my monthly Pinterest-inspired creation. Several weeks ago my stitch group held our annual Birthday Party. On this special stitch day, we all bring a dish for our luncheon and we celebrate our group members' birthdays all on one day. I like to bring a little handmade item for each of the ladies in our group.

This month I tried my hand at making needle minders. There are quite a few different kinds on Pinterest, so I chose: 1) fabric covered button needle minders. This video is by Stitching Mae and can be found HERE. 2) DIY magnets using glass flat marbles and Mod Podge. The tutorial is by Crafts By Courtney. 3) Alcohol ink magnets also done on flat glass marbles by Sarah Jane's Craft Blog.

Some of these were intended to be refrigerator magnets, but they can also be used as needle minders with the addition of an extra magnet. I'm going to start with the ones I like best, which were Stitching Mae's fabric covered button needle minders.
These were extremely easy to make and turned out the cutest and most practical. Because the button forms you use are made of metal, the needle sticks firmly to the minder.
I used a Sew-Ology brand button kit that I bought at Hobby Lobby. Pictured above is the form (the white thing), the pusher (blue thing), and a pack of additional metal buttons. Please follow the easy-to-follow instructions on the video, which I've linked above. I used regular round black magnets for these, but have since learned that these can leave a mark on your fabric. In the comments section of the video, someone suggests using clear nail polish on the parts of the magnets that will touch the fabric. I haven't tried that, so can't vouch for it, but might be worth a try with a test run on some scrap fabric.

Next I tried to make the flat glass marble and scrapbook paper needle minders using the tutorial from Crafts By Courtney. I bought a bag of clear glass flat marbles from the dollar store and used stuff I had in the craft room to make them.
These were fun to make. The glass has a magnifying effect on the material you Mod Podge to the back, so the effect was really pretty. The marbles I bought weren't perfectly round, so I couldn't use any kind of puncher. Rather, I had to trace onto the paper using the marble and do some careful trimming. I started off using the regular round black magnets on these and quickly found that while the needles stuck to them, they didn't stick very well and would fall off easily because of the thickness of the glass. So I substituted some rare earth magnets and solved the needle-sticking issue. But that brought on a whole new issue: those little rare earth magnets are strong! If you have any kind of hand weakness or pain, these are pretty difficult to pry apart to use on fabric. In addition, prying too hard will rip the magnet right off the scrapbook paper.
Rare earth magnets all stuck together. 
One more that I made. I got to use glitter!
I think that these glass ones would be better used as fridge magnets as originally suggested in the tutorial.

The last one I attempted was again using the clear flat marbles. This time, though, I used alcohol ink to make a "pretty" design.
Confession time: this was my first time using alcohol inks. I think they turned out just ok. I need a lot more practice with the inks! These never made it to actual needle minders, but I will glue a magnet on the back and use them for refrigerator magnets.

Speaking of glue, for the glass ones I used E-6000. It's a good, strong glue and it's used by crafters for many things. However, the stink that this stuff gives off is awful. And yes, I did use it in a well-ventilated area - my garage with the doors open. Even after using the glue and removing the stuff I glued, it took a few days for the stench to disappear from the garage. (I also noticed that the needle minders retained some of the smell even when I gave them as gifts!) So I got out the tube of trusty 527 Craft Cement and used it on the fabric needle minders. It worked perfectly and with very little "glue smell".

So the winner here is clearly the fabric-covered button needle minders. So fun and easy to do, and a great way to use small fabric remnants. By the way, I usually cross stitch in hand (no hoop or Q-Snaps), so I don't use needle minders on my fabric. I still use them though. I just put one on the table and deposit my needle on it when not in use.

I don't think I'll be using these glass marbles for needle minders anymore, but I did find some little thinner glass squares that are used for jewelry, and I'll see what I can do with those. That's the fun of crafting. Figuring out what works and what doesn't can actually be fun!

Sunday, July 24, 2016

Let's Talk Stitching

I'm happy to say that I've been stitching more lately, having a little more time after completing some other projects. My problem is that I keep coming up with more projects to do! But isn't that what crafters do?

Back to stitching, I finally completed my first square for the Rainbows For Peace And Comfort group.
You can see my original post explaining what this group is all about HERE. In addition, if you're interested in learning more, you can go to this Facebook page. Thank you to Loretta at Stitching the Night Away for the free pattern. I did change it up though. In the chart, the letters are white (the color of the fabric), and the background is in the rainbow colors.

I'm going to stitch at least three more squares. I started with one of the Rainbow Butterflies (from the Etsy shop called ClimbingGoatDesigns), but was stitching it on evenweave. The group asks that the squares be stitched on Aida. Then we were told that evenweave is ok. So in my state of confusion, I decided to buy some Aida and stitch this design on it. Now I know why I don't stitch on Aida. This cloth was particularly stiff to the point of being scratchy. And even though I was using a small petite needle, I had to work to pull it through which left my thumbs pretty achy. I already have thumb joint issues, so this wasn't an easy, quick stitch.

So now that I've finished this square, I'm going to go back to evenweave. I want to stitch more squares and contribute to this worthwhile project! Do you have a favorite or not-so-favorite fabric for cross stitch?

At a recent stitch day with my stitch group, the Sisters In Stitches, I decided to work on a WIP which you have seen in past posts - Kaleidoscope by Sheena Rogers Designs.
I made a lot of progress on this. As you can see, I completed the inner flower motif and am now working on the outside section. And it was a pleasure working on the buttery-soft Jobelan I chose for this project! Also, I noticed that I could stitch a lot faster on this fabric because I wasn't having a tug-of-war with the needle!

My birthday was several months ago, but I never posted about the little gift I bought for myself - a set of DMC Coloris floss! It's their brand new line of variegated floss and is a little different from their traditional variegated colors.
They're a blend of different color combinations and would work beautifully in designs using one floss color. I think that this Ink Circles design, Flower Power, would look good stitched with one of these flosses. What do you think?
I just bought this chart and may be stitching it with Coloris thread.
There are 24 different color blends, everything from Christmasy, one that looks autumnal, a red, white, and blue combo, several springtime looks, deeper color blends, and more. The pack also included some charts that would be appropriate for these variegated threads. Use this link to see more about Coloris threads.

I hope you enjoyed my all-stitching post. I'll keep you updated on my progress in the stitching world. Thanks for stopping by. If you're not already a follower, please consider becoming one. And I love getting comments, so please tell me what you think about my blog!

Friday, July 15, 2016

Where Bloggers Create 2016

I'm really happy to be participating in the Where Bloggers Create event for 2016. Thank you to Karen at My Desert Cottage for organizing this event.

Among the creative things I do are cross stitch, jewelry making, beadwork, sewing, and all kinds of miscellaneous crafting. I consider myself very lucky to have a designated space in my home that's just for working on projects and storing supplies. A small extra bedroom became my craft room as soon as we moved into this house seven years ago. It has evolved over the years, when I move things around and added things here and there.
This is what you see when you walk in.
I've worked on making my creative space as comfortable and organized as possible. Fun second-hand finds make up most of the furniture in here. Below is a bookcase that we bought for our son's room when he was young. Now it houses craft books, cross stitch charts and magazines, jars of important crafty items, and odds and ends.
Jars are recycled to hold buttons, wine corks, scrabble tiles, and other stuff. And that is indeed Mr. Peanut holding a lot of orts (cross stitch term for thread ends), which you might be wondering why I keep. I don't really know.
On the right in the picture below, you can see my armoire. This used to be a TV cabinet that I got a great deal on. Getting it home and into the craft room was another story. My husband and brother in law say that the only way it's leaving the room is through the window in pieces. I don't want to think about that. I like it too much!
Here's a look on the inside. Thanks to my husband, Mark, it now has extra shelves and a closed back. And it really does hold a lot. I keep cross stitch threads, miscellaneous craft supplies, and even a little tool kit in here.
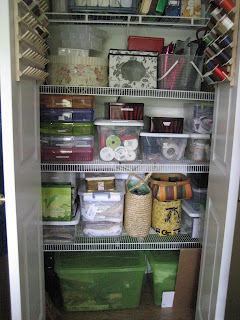
On to the closet. This room has a standard bedroom closet in it, so we got rid of the hanging space and added extra shelving. Perfect for bins with ribbon, yarn, fabric, more cross stitch thread and fabric, paints, pine cones, and more. That thread holder makes me so happy. And I'm filling up a second one!
This bead cabinet is one of my few "new" purchases. It just is the best use of space for organizing beads and jewelry supplies. The little table to the right of it is an auction win and is my first chalk paint project.
This is what an organized bead drawer looks like. You should have seen how I used to "organize" them.
Let's go to my craft table. It's one of my favorite things in the room. I found a local furniture maker who makes rustic furniture and he made this simple piece. I like that it has two drawers that go almost the width of the table. You can see it in my first photo waaaaay at the top of this post.
Antique store metal three tiered display shelf.
Metal parts bin from a hardware store spray painted a copper color. Great for misc. items.


Also on my craft table are a couple of items that Mark made for me. He does lathe wood working and created this lamp and pencil holder.
Below is an old ladder display shelf that has seen better days, but it does a wonderful job of holding sewing baskets and boxes.
It's not wonky. That's just my photo taking.
There's a little seating area in the craft room. I'd wanted a comfy chair to sit in and stitch or do some beadwork and watch TV. Yes, there's a TV in the room. Don't laugh. Sometimes a little mindless television watching does wonders for the creative process. Anyway, the chair issue. The problem is that the doorway to this room is so narrow that many really comfy chairs are impossible to get in! This is the second one I've tried. It's ok, and it's cute, but not a chair you just want to sink into. Still on the lookout.
See that cushion? It's from a 1970's Avon kit and I embroidered it in, well, the 70's!
Here's one of my favorite projects from a while back - my fabric bulletin board! You can barely see it with all of the stuff on it, but take a look anyway.
Thank you so much for visiting my crafty space today. I appreciate it and welcome any comments, feedback, or suggestions you'd like to give. Please come back to visit my blog sometime and consider becoming a follower of CraftyCat! Now, I can't wait to see all of the fun creative spaces when I start my own visits to "Where Bloggers Create 2016".