Saturday, October 30, 2010

The Bulletin Board Project

It's been a while since I posted, but that doesn't mean that I haven't been involved in some sort of craftiness. It's just that I've been stitching a lot, but not completing anything. I'll work on that. I do want to show you a very cool bulletin board that I made for my crafting area. I knew I wanted some kind of board to tack things like photos and cards to, but it had to be more fun than an ordinary cork board.

So I went online and located these directions supplied by the DIY Network and found them easy enough to follow. For the fabric selection, I enlisted the help of Sheila, who has an eye for choosing and combining different colors. The fabric I chose is a quilt fabric in an up-to-date paisley print in aquas, blues, tans and browns. The rope trim is a cream color and the ribbon for the diagonals is brown. Luckily I have a husband who has all kinds of wood tools, including saws, so I just put in my order for a plywood rectangle in the recommended size.

I found the instructions easy to work with and soon I was ready to staple. Let's just say that the hand-held (not electric) staple gun and I haven't always been friends. But now that I learned to use it correctly, the job of stapling the fabric to the back of the plywood was quickly completed. The most difficult part of stapling was trying to figure out how to reload the staples into the thing. I tried one way, then another, then decided to break for lunch. When I got back, that little light bulb popped on over my head (that seems to happen a lot to me) and I figured out that the way to load staples was the most counterintuitive process I've ever seen.

Close to completing my bulletin board project, I realized some things. First of all, all of those giant staples would probably scratch the heck out of the wall, so I hot glued a piece of fabric onto the back of the board once I was sure I was done with stapling. Then, I noticed that the scraggly ends of the rope trim are going to be visible. I solved this problem by buying some pretty big buttons and hot gluing one over the ends and another directly across the board from that one. Finally, after hanging the board on the wall and placing some items in it, I found that they were falling through. I knew that I would have to secure the places where the ribbons criss-crossed each other. Ordinary thumbtacks and a hammer were all that were needed for that. If I made another one of these, I'd use a thicker loft batting. I think that would solve that problem. After the thumbtacks were in place, I glued some little flat glass acorns right onto the thumbtacks. I don't know where I got these and what I intended to use them for, but they were just the right thing for this project.

The great thing about this bulletin board project is that it can be done for very little money. Most fabric stores have a nice selection of remnants and you don't need that big of a fabric piece for this. Plus, the remaining supplies can all be purchased very inexpensively. This was a fun project to do and no special skills were needed, thank goodness. I'm all about simplicity.

If you're reading this blog on Facebook, go to the bottom of the blog and it says something like "View Original Post" and click on that. The blog looks much better in color. And if you get a minute, become one of my blog followers. It doesn't cost anything, and who knows what you'll learn here.

Wednesday, September 15, 2010

Wish I Had A "Before" Photo


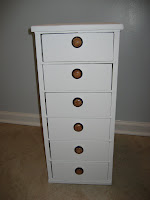
While at an cool antique mall out of town, I happened to find this little cabinet. I'd been wanting additional bathroom storage and this fit the bill, size-wise. Otherwise, it was a little beat-up looking. Big deal, nobody's going to actually see it, right? A previous owner had painted the outside of it a dreary maroon color and left the drawers the original (I think) wood grain. After looking at it a while in it's new abode, a little light bulb popped on over my head. Wouldn't this look so cute painted white? With some nice little ceramic drawer pulls? Since Mark is the furniture painter in the family, he got all crafty with it and TA-DA!, now we have this sweet little cabinet that fits in ever so nicely in the bathroom. Oh, and just to be technically correct about furniture painters in the family, I just remembered that Matt is too! Check this out.

I also have a new finish of my own to share. This is "Black Cats' Halloween" by Waxing Moon Designs. It was fun to stitch and easy, considering I used only black floss. My plan is to have it framed by Halloween. It would be fun to decorate a black frame in a Halloween theme. We'll see. My, how crafty we've been.

If you're viewing this post on Facebook, please click on "View Original Blog" at the bottom so that you can see my blog in all of its colorful glory. I would love to have more followers to add to my two original faithful followers (see right side of blog labeled "Followers"). That would make my day.

Tuesday, August 31, 2010

A Finish!


I'm happy to say that I finished the Pledge Of Allegiance flag that I've been working on. Everyone who sees this thinks that it's some combination of complicated stitches, but it's just good old cross stitch. Well, and some backstitching. But complicated it is not. I'll be keeping this one.

Now I'm on to some Halloween stitching. I don't do a whole lot of Halloween stitching, but I found one with a vintage-looking cat that I couldn't resist. I'll post photos when I get a little more done.

Wednesday, August 4, 2010

What I've Been Up To, Stitching-Wise

The thing about having a knee injury is that you're limited in the things you can do. Anything that involves going low to the ground or high up isn't going to happen. So there go my plans for straightening out those pesky low chaotic kitchen cabinets or painting the room that we swear was last painted by drunken chimps. No gym time either.

So all of this gave me more time for stitching, which was actually a very good thing. I also started working at The Stitch Store, and that causes, what? Inspiration? Temptation? Yes. Talk about a kid in a candy store. All I know is that I've been doing a lot more stitching lately.

Here's my current project, I Pledge Allegiance, by Bask Designs.

I'm currently working on the last red stripe and then have to stitch the words of the pledge around the flag. Very cool.

And finally, two of my earlier 2010 finishes, Little Ballerinas and Princess Parade by Country Cottage Needleworks. I stitched these
for my nieces' newly redone bedroom.

If you're reading this on Facebook, please do me a favor and go to the bottom of the post and click on "View Original Post" so that you can see my blog in all it's beautiful colorful glory. And I'd appreciate it if you'd become a follower. I have two faithful followers, but a few more would be nice!

More craftiness will be coming soon.

Sunday, July 25, 2010

My Crafty Roots

I've decided to change my blog to include the other crafts, aside from cross-stitch, that I like to do. And some that other people do too. So here is the relaunch of my totally revamped blog.

Crafting is something I've been involved in as far back as I can remember. As a child, I loved to color, draw and paint, and a new box of crayons was always cause for celebration. When I got older, my mom let me use her paint-on tube paints to color designs onto pillowcases. I doubt if they make these things anymore. It was a chemical-smelling product in a tube and you drew over a transfer. It probably wouldn't sound so interesting to many people, but it was truly fun to my crafty little self. And what about the paint-by-number sets which didn't look good no matter who did them. Didn't matter, it was lots of fun!

Later on, Mom taught me to actually cross stitch and do crewel embroidery on the pillowcase transfers. That's what started my love for cross-stitch and the world of floss and fabric. Soon I got into sewing and someone gave me a bunch of Barbie clothes patterns. My Auntie Helen was a avid seamstress and she'd pack up her remnants for me. I'd gladly trek all four blocks to her house for a bag of doll clothes fabric. And no sewing machine for me! I was probably about eight years old, so all sewing was done by hand. I remember making Skipper a really cute black and white print summer dress and Barbie was decked out in a thoroughly mod Palazzo pants sleeveless jumpsuit outfit. I ended up making lots of clothes for my dolls, using my tiny hand stitches and plenty of sew-on snaps. I was about 10 when I finally got to learn to use the sewing machine. As a teenager, I became pretty good at sewing clothes for myself, sometimes choosing patterns that were way beyond the scope of my knowledge just to see what I could learn.

There were other crafty adventures too: Crochet -- stylish drawstring purses! And beading -- who can forget those fun beaded choker necklaces we made in the early 70's? And all you needed was a little tube of beads and some elastic cord. We decorated blown-out eggs with sequins and glitter for our Easter egg tree, and when Christmas came around, we stuck pins full of beads and sequins into styrofoam balls for ornaments. One Easter I was totally enthralled with making little Easter baskets out of plastic butter containers and pipe cleaners. It seems like I was always doing something.

As I look back, I realize how much these early craft projects influenced the kind of crafts I do today. I also can't ever remember being bored as a kid. I'm glad that my mom encouraged the artistic sides of both my sister and me. Sheila shared many of my craft endeavors, and then some.

In future posts I'll be talking about my current crafty adventures, along with those of other crafters. I plan to include lots of photos and other info about my projects. So stay tuned. I think this is going to be fun!